
Thu, June 19, 2025
Transferring data from CRM to GA4 via Measurement Protocol using Server-Side GTM
After reading the title of this piece, you might ask: “Why even do this in the first place?” Why not just send data directly to GA4 via Measurement Protocol? Why involve Server-Side GTM at all?
The short answer: as always, using Google Tag Manager — whether client-side or server-side — helps reduce the workload for developers. The full answer will become clear as you read on.
Here’s what we’ll cover today:
- Is sending data via Measurement Protocol using Server-Side GTM a “workaround” or not?
- What are the advantages of using Server-Side GTM for Measurement Protocol instead of the classic approach?
- How to collect Client ID and Session ID without involving a developer — to later use in Server-Side GTM
- How to configure data transmission to GA4 via Measurement Protocol using Server-Side GTM
- Instead of a conclusion
Is using Measurement Protocol with Server-Side GTM a “workaround”?
Before diving into the solution, I want to clarify that this method is by no means a “hack,” as it might seem at first glance. Here are two arguments to support that:
- Server-Side GTM has had a Measurement Protocol (GA4) client available almost since its launch. So it’s fair to assume Google always intended for Measurement Protocol requests to be sent via server-side containers.

2. As you’ll see, the entire solution is built almost entirely on native Server-Side GTM functionality — with the exception of one custom tag template.
In short, this setup is a solid demonstration of built-in Server-Side GTM features that, for some reason, are rarely talked about.
Why Server-Side GTM and Measurement Protocol is Better than the Classic Setup
Now that you know this isn’t a workaround but a thoughtful, supported approach — let’s break down its advantages. As I mentioned earlier, the main benefit is reducing the load on your dev team. But where exactly does that “load reduction” happen?
To send data via Measurement Protocol — e.g., about a completed sale from your CRM — you typically need:
- To collect the Client ID and Session ID at the moment the order is placed and store them in your database or CRM.
- Once you're sure the purchase is successful, send the transaction data — including Client ID and Session ID — to GA4.
There are only two steps. However, while many CRMs often have built-in functionality that allows sending webhooks to other services at the right moment, collecting and storing Client ID and Session ID usually requires involving a developer. In this article, we’ll break down how Server-Side GTM can help fully cover that first step.
How to Collect Client ID and Session ID Without a Developer Using Server-Side GTM
We usually think of GTM — even the server-side version — as something that processes and forwards data in real time. Storing data, especially in a way that it’s accessible later (even after the user has left the site), seems tricky. But thanks to GTM’s long-standing integration with BigQuery and Firestore, it’s actually pretty simple. For this use case, Firestore is the solution we need.
If you’re curious about how Server-Side GTM integrates with BigQuery, check out our other article: “Exporting GA4 Data to BigQuery via Server-Side Tag Manager.”
What is Firestore?
Firestore is a NoSQL database offered by Google as part of Google Cloud Platform (GCP). Its key benefit is real-time read/write access — no complex infrastructure or setup required. Exactly what we need to avoid relying on developers.
From Server-Side GTM, you can both write to and read from Firestore. For reading, there’s a built-in variable type called Firestore Lookup (we’ll get to that later). Writing requires a custom solution — but since the Server-Side Tagging APIs support it, the community already has ready-to-use tags. We’ll use one of them — just not yet.
First, you’ll need to create your own project in GCP, enable Firestore, and set up your first collection. To give you a complete picture of the technical implementation, here’s a detailed checklist you can follow step by step. Each point will be explained in more detail below.
- Go to an existing project in GCP or create a new one, and select Firestore;
- Create the required collection
- Set up recording of Client ID and Session ID to the Firestore collection at the appropriate moment
- Set up retrieval of Client ID and Session ID at the right time within Server-Side GTM
- Set up sending transaction data via Measurement Protocol to Server-Side GTM and enrich it with the necessary details, including Client ID and Session ID
- Don’t forget to enjoy the results ;)
Now, let’s go over each step — except for the first one. I’m intentionally skipping the process of creating a new project in GCP, since it’s a fairly standard signup flow for yet another service — and I trust you can handle it on your own. (Besides, GCP infrastructure is commonly used when setting up Server-Side GTM, so chances are, you’re already familiar with it.) So let’s move forward assuming you’re already on the Firestore page.
Creating a Collection in Firestore
On the screen, you should see something like the text “Create a Firestore database” and a large button. Click that button.

On the next screen, leave everything as is.

Let me highlight this again — on the first setup screen, LEAVE EVERYTHING AS IS. Don’t even change the Database ID.
Why leave it as is?
- The free quota can only be used with the
(default)database. And I’m sure you don’t want to pay extra, right? - But even if cost isn’t a concern — Server-side tagging APIs only support the
(default)database. - Server-side tagging APIs also support only Firestore in Native mode.
Any changes to the default configuration may result in your setup not working at all.
The only thing you can change, if needed, is the location of the database.

At this point, I also recommend taking a look at the cost. It’s very minor, and there’s a daily free quota — but still worth checking.

Now click Create, and you’ll be taken to your (default) database. Let’s get familiar with the basic structure of Firestore. Use the screenshot below for reference:
- The main entity is the database — in our case, it's named (default).
- A database consists of collections — for example, you might create collections like
orders,sessions, orusers. - Inside each collection are documents. For instance, the
orderscollection would logically contain order data — with each order as a separate document. In the screenshot, you can see document 765220 opened. - Each document contains fields — the actual data stored in simple key-value format.
It’s also possible to nest sub-collections within documents, but for our use case, this advanced structure is not needed.

Now that you're familiar with the main Firestore entities and terminology, let’s create your first collection named orders. Click the Start collection button.

In the popup window, enter the desired name into the Collection ID field and click Save.

Once done, your first collection will be created, and a default document will be automatically added. You can delete it or leave it as a placeholder — we won’t need it later, since new documents will be created automatically via Server-Side GTM.
Setting Up Data Writing (Client ID & Session ID) to Firestore
Before diving into setup steps, here’s a quick overview of the process:
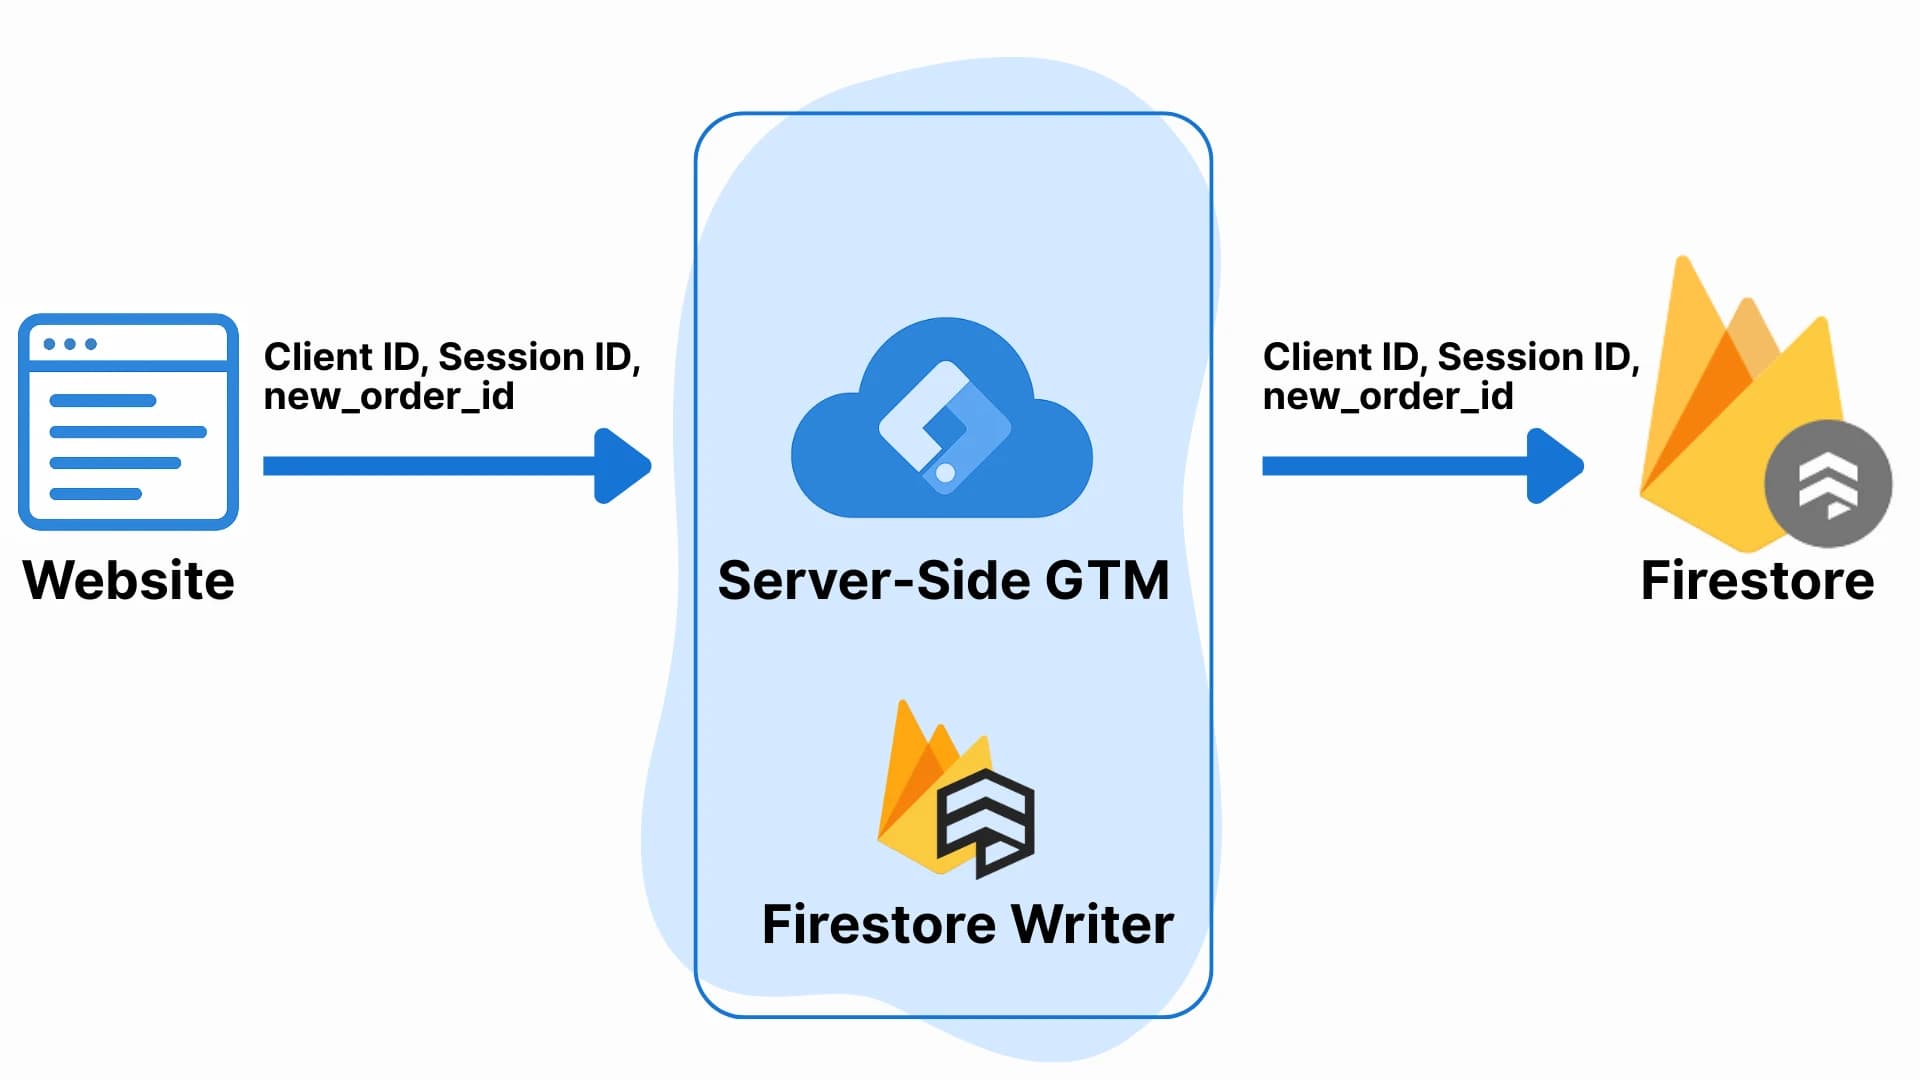
- First, you should have a GA4 event (e.g.,
new_order) sent from your website to Server-Side GTM. This event should include Client ID, Session ID, and a unique transaction identifier (in our case:new_order_id).

2. Next, you need to capture these values inside Server-Side GTM using Event Data variables. Create three variables.
Client ID

Session ID

New_order_id

3. Go to the Tags section in Server-Side GTM, create a new tag, and look for the community template Firestore Writer.

Configure the tag as follows:

- In the Firebase Path field, specify the path where the documents should be created:
orders/{{ED - transaction_id}}
The path format is Collection/Document, so we begin with orders — the name of our collection — and each transaction will be a separate document. To create it dynamically, we use the variable {{ED - new_order_id}}.
2. Check the box Add Timestamp
3. In the Custom Data fields, specify the corresponding variables for client_id and session_id
4. Add the appropriate trigger
This tag will write the necessary data to Firestore, but for it to work correctly, we need to set proper permissions.
By default, the integration between Server-Side GTM and Firestore looks for collections and documents in the same Google Cloud project where the GTM server is deployed. (This requires the environment variable GOOGLE_CLOUD_PROJECT to contain your project’s ID.)
If that variable isn’t set — or if you're using different GCP projects for Server-Side GTM and Firestore — follow the steps in this guide by Simo Ahava.
Well, if you, like me, prefer deploying Server-Side GTM on your own servers outside of the Google Cloud Platform infrastructure, then in order to use the Firestore API, you need to create a service account with the appropriate role (Cloud Datastore User) and save its JSON key in a file named local_service_account_key.json. Then mount this file into your Docker container using the -v flag, specify its path via the GOOGLE_APPLICATION_CREDENTIALS environment variable, and if needed, add the project ID via GOOGLE_CLOUD_PROJECT. More details on how to do this — here.
At this stage, it’s important to verify that Server-Side GTM can write data to Firestore. Go into Preview mode and perform actions on the site that generate the new_order eventю. If everything is configured correctly, a new document should appear in Firestore. Its ID should match the order ID, and the document fields should contain three records: client_id, session_id, and timestamp.

How to Send Data to GA4 via Measurement Protocol Using Server-Side GTM
Now that we have all the necessary technical data for proper Measurement Protocol delivery, let’s move on to the final step — sending everything to GA4.
To do this, we’ll need to set up the following:
- Sending data from the CRM/admin panel to the Server-Side GTM endpoint in Measurement Protocol format
- A Measurement Protocol (GA4) client that will receive the data
- An Event Data variable to determine which order to look up in Firestore
- Firestore Lookup variables to read the needed data from Firestore
- An Augment Event transformation to add technical data to the event
- A Google Analytics: GA4 tag to send the data to GA4
Yes, the list is quite long — but in practice, it’s all straightforward. Let’s go through each step in detail.
- Sending Data from the CRM/Admin Panel to the Server-Side GTM Endpoint in Measurement Protocol Format
In essence, either your developer or you personally should configure your CRM to send data to the Server-Side GTM endpoint. Note: you don’t need to store any additional order-related data in advance, unlike with standard Measurement Protocol use cases.
The following request body will be sufficient — and in most cases, this data already exists in your CRM:
{
  "non_personalized_ads": false,
  "events": {
    "name": "purchase", // optionally use another event name
    "params": {
      "currency": "USD", // optionally use another currency
      "transaction_id": "771172", // your order ID
      "value": 500, // order value
      "page_location": "https://proanalytics.academy/mp-success-page/", // optional: pseudo-page where event occurs
      "items": [ // optional: pass product details with the ecommerce event
        {
          "item_id": "111",
          "item_name": "Course PRO GTM",
          "quantity": 1,
          "price": 500,
          "currency": "USD"
        }
      ]
    }
  }
}
2. Now that we’ve prepared the necessary data in the correct format, let’s create a Measurement Protocol (GA4) client to receive it. You’ll need to configure the following settings:
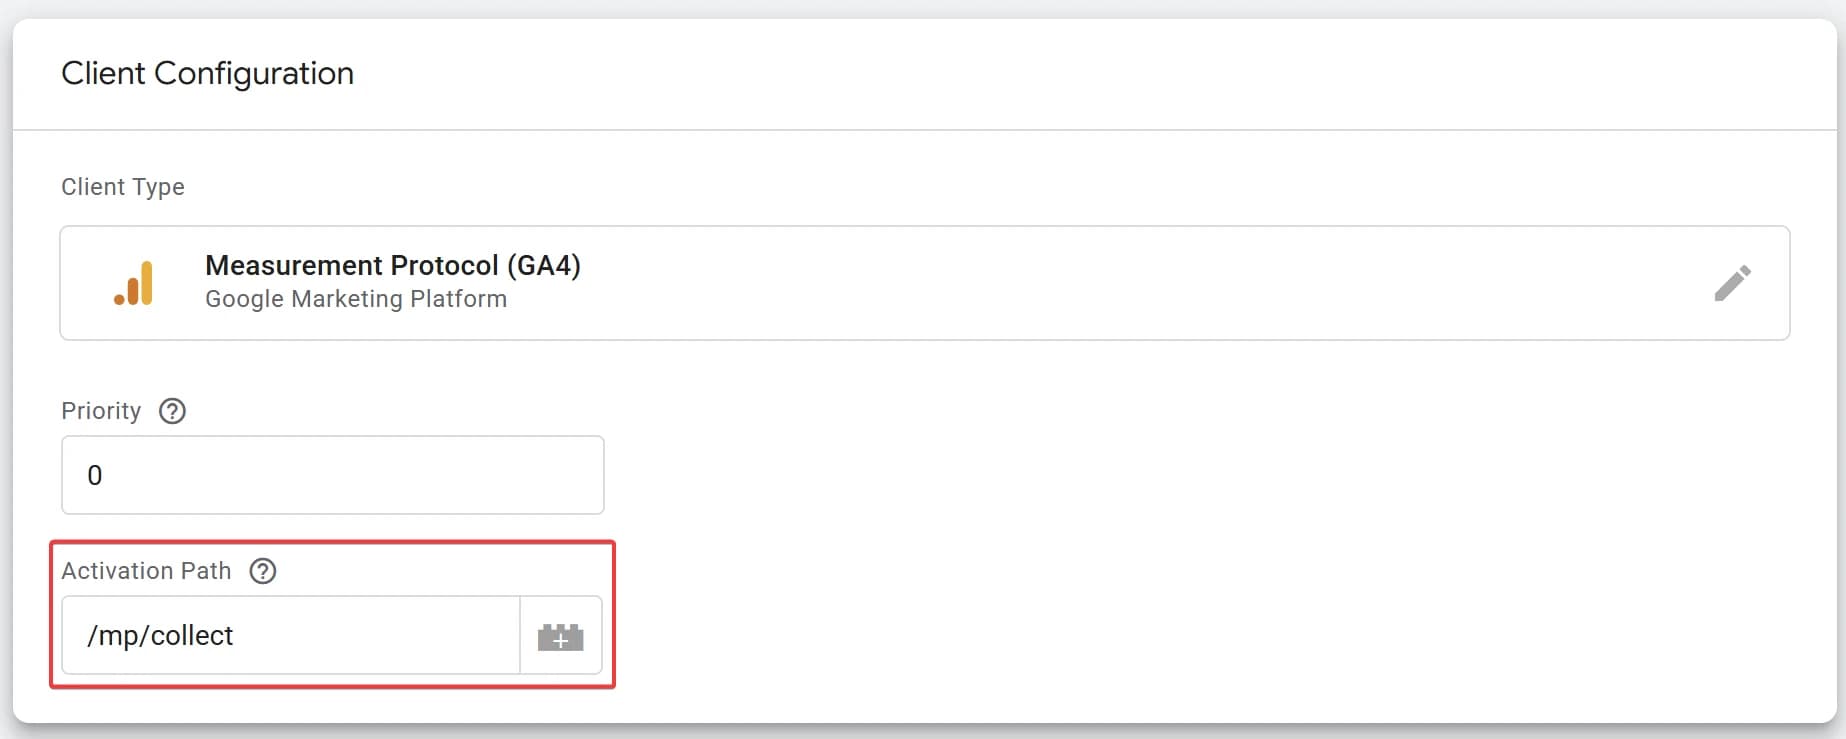
Pay attention to the Activation Path field. The value you specify here will be part of the full URL used to send data from your CRM. The full endpoint URL should look like this:
[Server_container_URL][Activation_Path]?measurement_id=[Measurement_id]&api_secret=[API_secret], where:
[Server_container_URL]- can be found in your Server GTM container settings[Activation_Path]- set manually in the client settings[Measurement_id]- your GA4 stream ID[API_secret]- created in GA4 under: Admin > Data collection and modification > Data Streams > Events > Measurement Protocol API secrets
In my case, the final URL looks like this: https://s.proanalytics.academy/mp/collect?measurement_id=G-69QKQNXXXX&api_secret=cP1HMToaS7yVTOncLV-XXX
This is the endpoint we’ll send data to from Step 1.
3. The next step is to create an Event Data variable that helps identify which order to look up in Firestore. In its configuration, simply specify the parameter name from which to extract the value.

We’ll use this variable in the next step to dynamically fetch the relevant data from Firestore.
4. Now create Firestore Lookup variables to read the required values from Firestore. Configuration example:
- FL - client_id

- FL - session_id

- FL - timestamp

As you can see, the configuration is quite straightforward:
- Lookup Type - Document Path
- Document Path - orders/{{ED - transaction_id}}
- Key Path - specify the desired value:
client_id/session_id/timestamp
5. Now let’s create a tag of type "Google Analytics: GA4" to send the data to GA4. Nothing special in the configuration — just enter your Measurement ID and event name.

For the trigger, use a Custom Event with the following settings:

6. And now for the most interesting part — the magic happens here: Create an Augment Event transformation to seamlessly inject the required technical values into the event. Here’s what you need to configure:

Assign the Firestore Lookup variables from Step 4 to the appropriate keys: client_id, ga_session_id, and timestamp_micros.
Pay close attention to the Affected Tags block. To ensure this transformation only applies to your GA4 tag (and not others), select Some Tags and choose the tag created in the previous step.
That’s it — setup is complete. Now it’s just a matter of waiting for the first events to appear in GA4. If everything is configured correctly, this is what you should see:

Instead of Conclusion
At first glance, the solution described above may not seem like the simplest to implement. But if your project is already using Server-Side GTM for data transmission, this method can significantly ease the workload for your developers and speed up the implementation of GA4 data tracking using the Measurement Protocol.
And let’s not forget — this approach is highly versatile. By storing a bit more data in Firestore (e.g., Meta values from _fbp and _fbc cookies), you can use a similar logic to send real purchase data to ad platforms like Meta or TikTok using their respective Conversion APIs.
This setup — like many others featured on this blog — demonstrates how GTM, when used properly, can dramatically improve tracking quality and save valuable developer time.
And if this still feels a bit overwhelming — join my Server-side GTM Basics or PRO GTM courses, and I’ll teach you how to work with GTM confidently and with ease.

Web Analyst, Marketer
Have thoughts or feedback?
Share with others and join the discussion.Loading comments…