
Sun, September 2, 2018
Tracking User Interactions with Forms Using Google Tag Manager
The original article was written on September 2, 2019, and it focused on sending data to Google Analytics Universal. However, during the migration of the blog to a new CMS, I decided to update the content to reflect the current version — Google Analytics 4.
Among the three main ways to submit a request on a website — submitting a form, making a phone call, or writing in the chat — the first one accounts for the lion’s share and is tracked much more often than the others.
Most internet marketers want to know exactly which sources bring visitors who submit forms, and that’s great. But beyond successful submissions, there are other types of interactions with forms, and tracking them helps us understand why some interested users never actually converted. Let's explore how to track the following user interactions with forms (listed from simplest to more advanced):
- Sending an event when the form’s submit button is clicked
- Capturing the value entered into form fields
- Checking the validation of the entered values
- Tracking changes to form field data
Sounds interesting? Then let’s dive right in
Let’s start simple — tracking a click on the form’s submit button. You’ll need to:
- Enable the built-in Click variables.
Go to the Variables section -> Configure
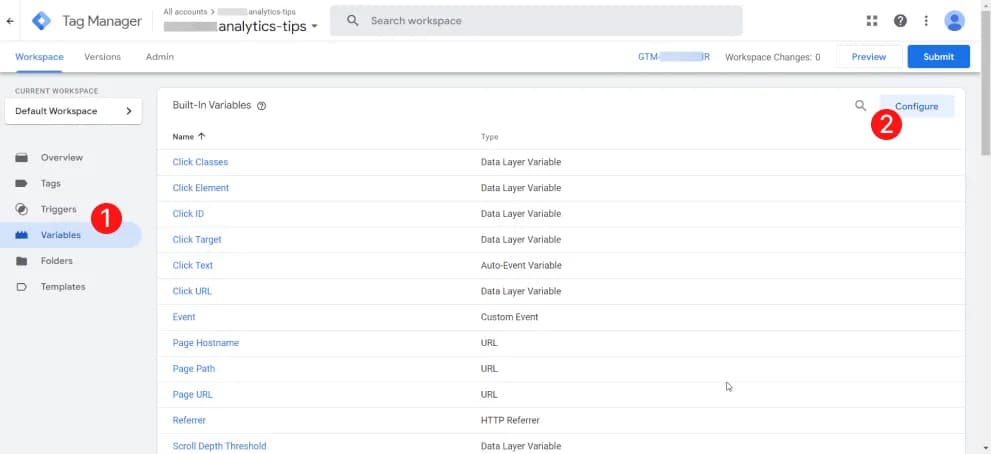
- Check all variables in the Click category:

- Find the ID, class, or CSS selector of the desired button. Most often, the required element does not have a class or ID, so we’ll use the CSS selector approach.
The next few instructions are based on Chrome; if you use another browser, perform equivalent actions.
Right-click the desired element and choose Inspect. In the opened window, right-click again on the highlighted code and choose Copy > Copy selector:

Sometimes multiple elements match the same selector. To ensure you’ve copied the selector that matches all the required elements, you can use my PROANALYTICS extension. This tool highlights the elements on the page that match a given CSS selector.
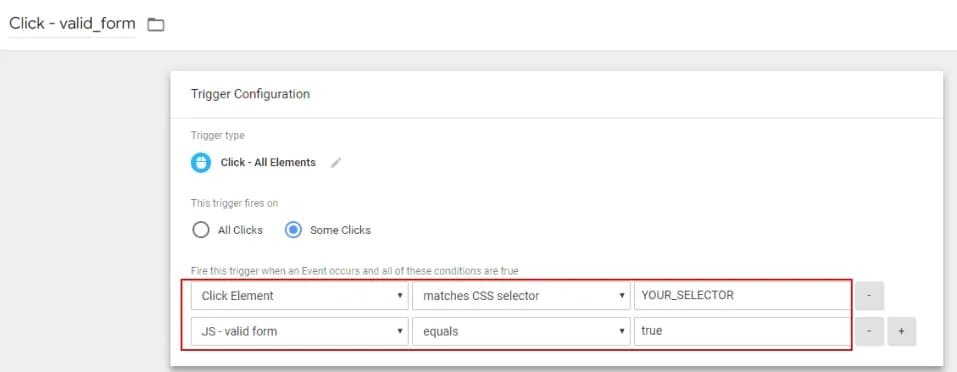
- Create a trigger with the desired condition.
Choose trigger type: All Elements. Activation conditions: Some clicks, then specify the condition:
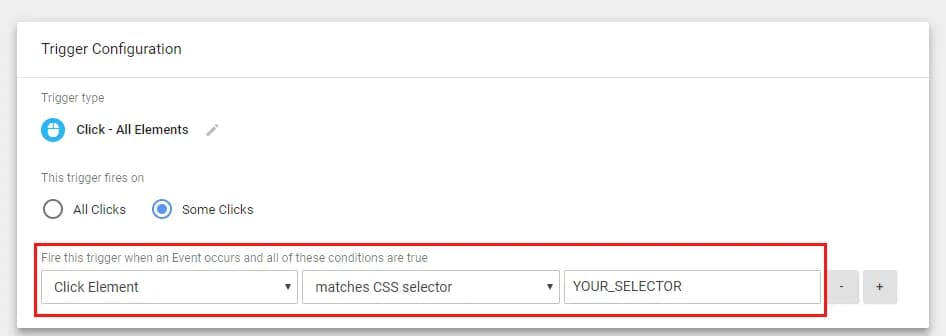
Replace YOUR_SELECTOR with the copied CSS selector.
- Create a tag to send data to Google Analytics 4.
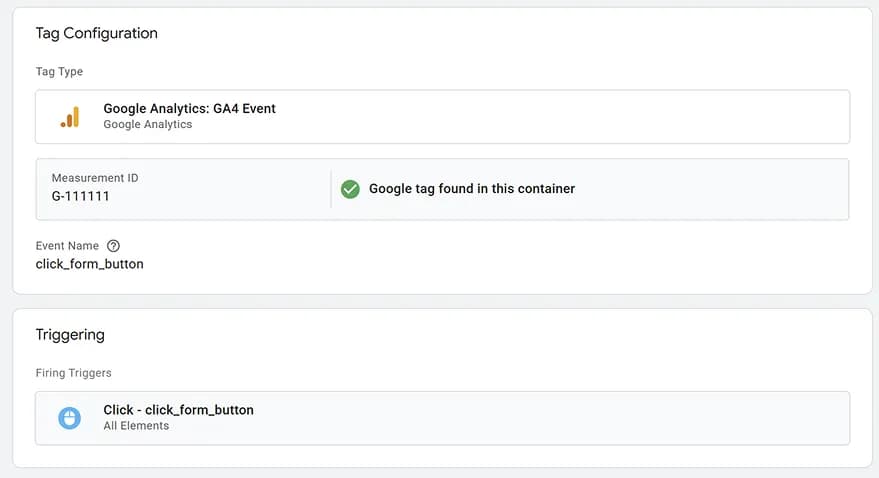
That’s it! Your setup for tracking form button clicks is complete. For more on click tracking, see my article: Tracking Element Clicks on a Website Using GTM.
Capturing the Value Entered into Form Fields
To validate form fields on form submission, we first need to learn how to save the values entered by the user. For this, we need a Custom JavaScript variable with the following code:
function() {
  var element = document.querySelector('YOUR_SELECTOR');
  return element ? element.value : undefined;
}
This code:
- Looks for the element by the CSS selector
YOUR_SELECTOR - If the element is found — returns its
.value - If not — returns
undefined(to avoid GTM errors)
Before use, replace YOUR_SELECTOR with the CSS selector of the relevant field. You can find it using the same method as for the button selector, just right-click on the input field instead.

To check whether you copied the correct selector, run this code in the developer console:
document.querySelector('YOUR_SELECTOR')?.valueIf it’s correct, you’ll get the current value of the field:

Your created variable will look like this:

Now you can use this variable to send data to any external system. Happy? Me too! It’s time to move on to setting up form validation in Google Tag Manager.
Validating Form Field Input Values
For this, we’ll need another Custom JavaScript variable — let’s call it {{JS - valid form}}:
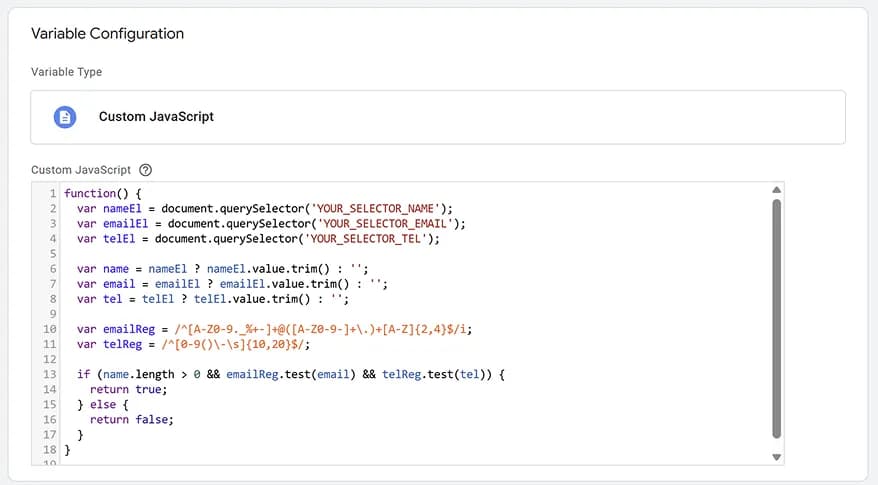
Here’s the code you can copy:
function() {
  var nameEl = document.querySelector('YOUR_SELECTOR_NAME');
  var emailEl = document.querySelector('YOUR_SELECTOR_EMAIL');
  var telEl = document.querySelector('YOUR_SELECTOR_TEL');

  var name = nameEl ? nameEl.value.trim() : '';
  var email = emailEl ? emailEl.value.trim() : '';
  var tel = telEl ? telEl.value.trim() : '';

  var emailReg = /^[A-Z0-9._%+-]+@([A-Z0-9-]+\.)+[A-Z]{2,4}$/i;
  var telReg = /^[0-9()\-\s]{10,20}$/;

  if (name.length > 0 && emailReg.test(email) && telReg.test(tel)) {
    return true;
  } else {
    return false;
  }
}
Replace YOUR_SELECTOR_NAME, YOUR_SELECTOR_EMAIL, and YOUR_SELECTOR_TEL with the CSS selectors for the corresponding form fields. (See earlier sections for how to get them.)
Now that we’ve set up validation inside a GTM variable, let’s create a trigger and tag to send the data to Google Analytics 4. Create the trigger just like for a standard button click — the only difference is that the validation variable must return true.
The tag will look like this:

Tracking Data Changes in Form Fields
We’ve covered how to track both form submission attempts and successful submissions using Google Tag Manager. But there’s one gray area left — visitors who start filling out the form but never submit it. Let’s fix that!
You’ll need:
- A tag with a trigger to track interaction with form fields.
Create a Custom HTML tag with the following configuration:
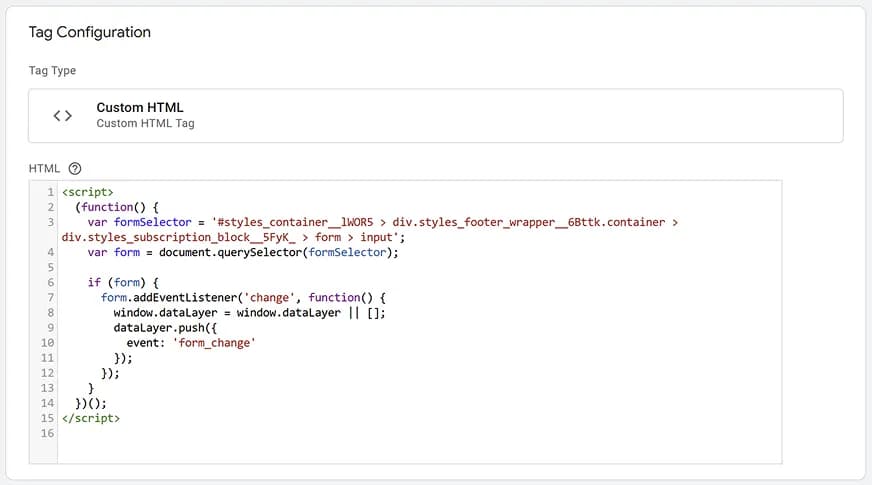
Code to use:
<script>
  (function() {
    var formSelector = 'YOUR_SELECTOR';
    var form = document.querySelector(formSelector);

    if (form) {
      form.addEventListener('change', function() {
        window.dataLayer = window.dataLayer || [];
        dataLayer.push({
          event: 'form_change'
        });
      });
    }
  })();
</script>
Replace YOUR_SELECTOR with your form’s CSS selector.
Set the trigger to Window Loaded. It’s best to limit the trigger to only those pages where the form exists. For example, on the homepage, your setup might look like this:
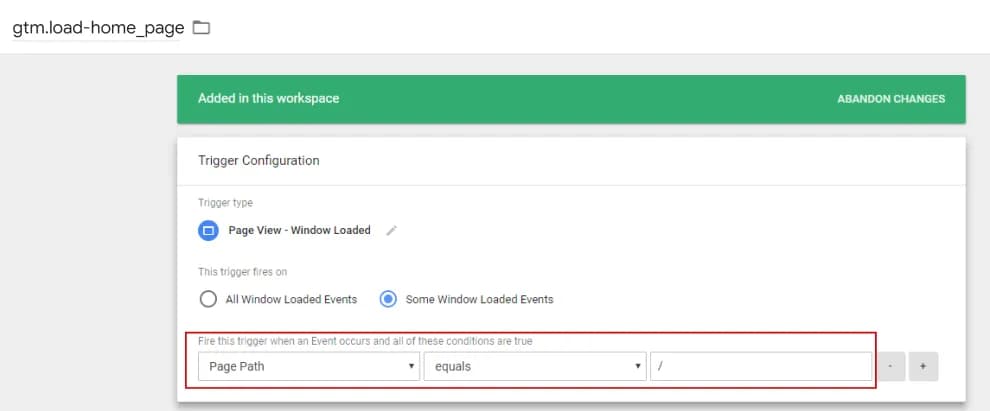
As a result, when a user changes the value in any form field, we push a form_change event to the dataLayer, which lets us create a trigger for this event in the next step.
- A tag to send data to GA4 using this trigger.
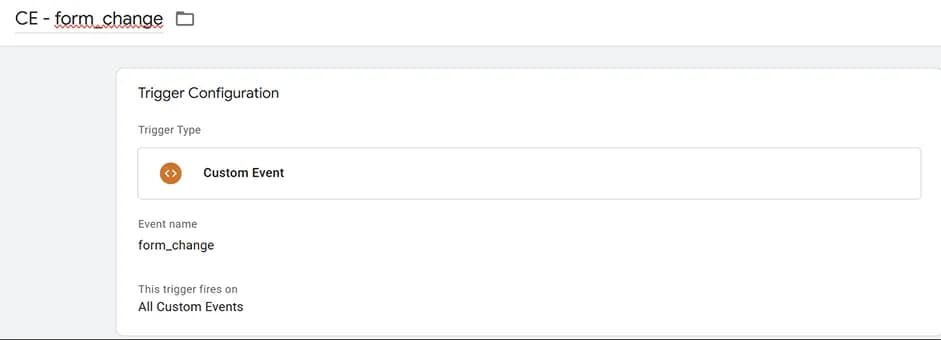
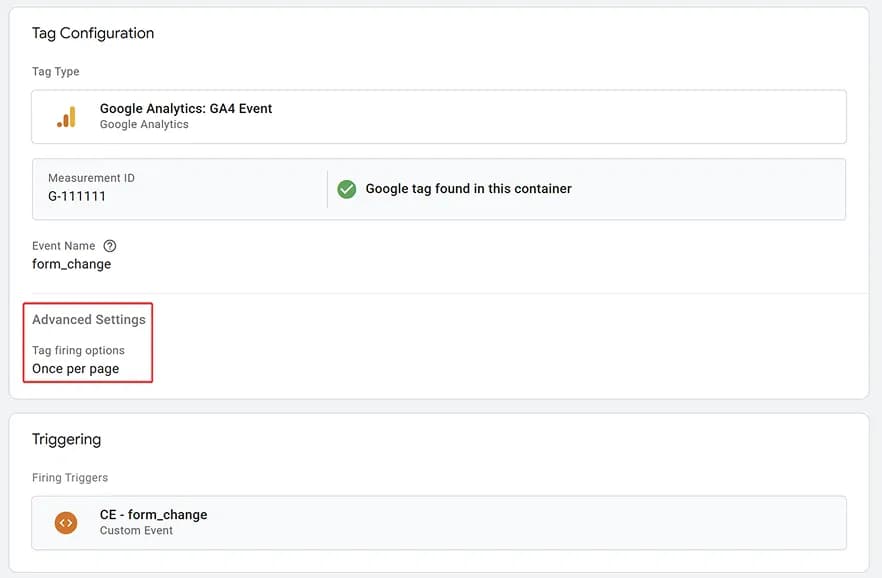
Create a Custom Event trigger and enter the event name:form_change.
When creating the tag to send data to GA4, go to Advanced Settings -> Tag firing options and select Once per event. After all, we don’t want the event firing every time a user changes a field value.
The tag will look like this:
Instead of Conclusion
Based on the collected data, you can build a funnel to understand at which stage users drop off during form interaction:
- Users who interacted with form fields
- Users who tried to submit the form
- Users who successfully submitted the form
If your site has multiple forms, I recommend sending the form name as an event parameter. This way, you can build funnels both for the entire site and for each form individually. I wrote more about event parameters here.
If you still have questions about form tracking with Google Tag Manager, check out the following materials or drop your questions in the comments.
- Tracking Form Submission Using the Element Visibility Trigger
- Tracking Form Submission Using the Basic GTM Trigger
P.S. Should I continue explaining what specific JavaScript code does in future articles, or is that already obsolete in the age of ChatGPT?
If you enjoyed this content, subscribe to my LinkedIn page.
I also run a LinkedIn newsletter with fresh analytics updates every two weeks — here’s the link to join.

Web Analyst, Marketer
Have thoughts or feedback?
Share with others and join the discussion.Loading comments…